All Tutorials  ⟩  The CATALOG  ⟩  Catalog Workflow  ⟩  Filling Data

The Fill Data Function

The Fill Data function makes short work of copying metadata information from one track to many. With a click of a button, quickly move all critical metadata from a Primary track to its linked Alternate & Stem versions. Or pick more generic information to fill across a selection of unlinked tracks.

TrackStage Icon

Filling Data

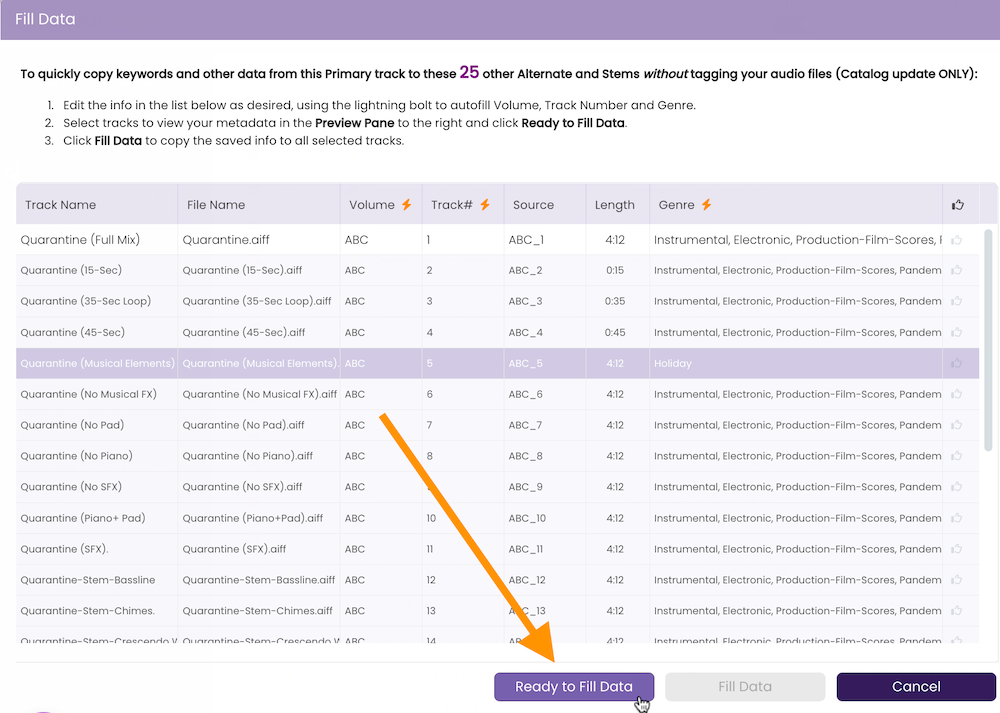
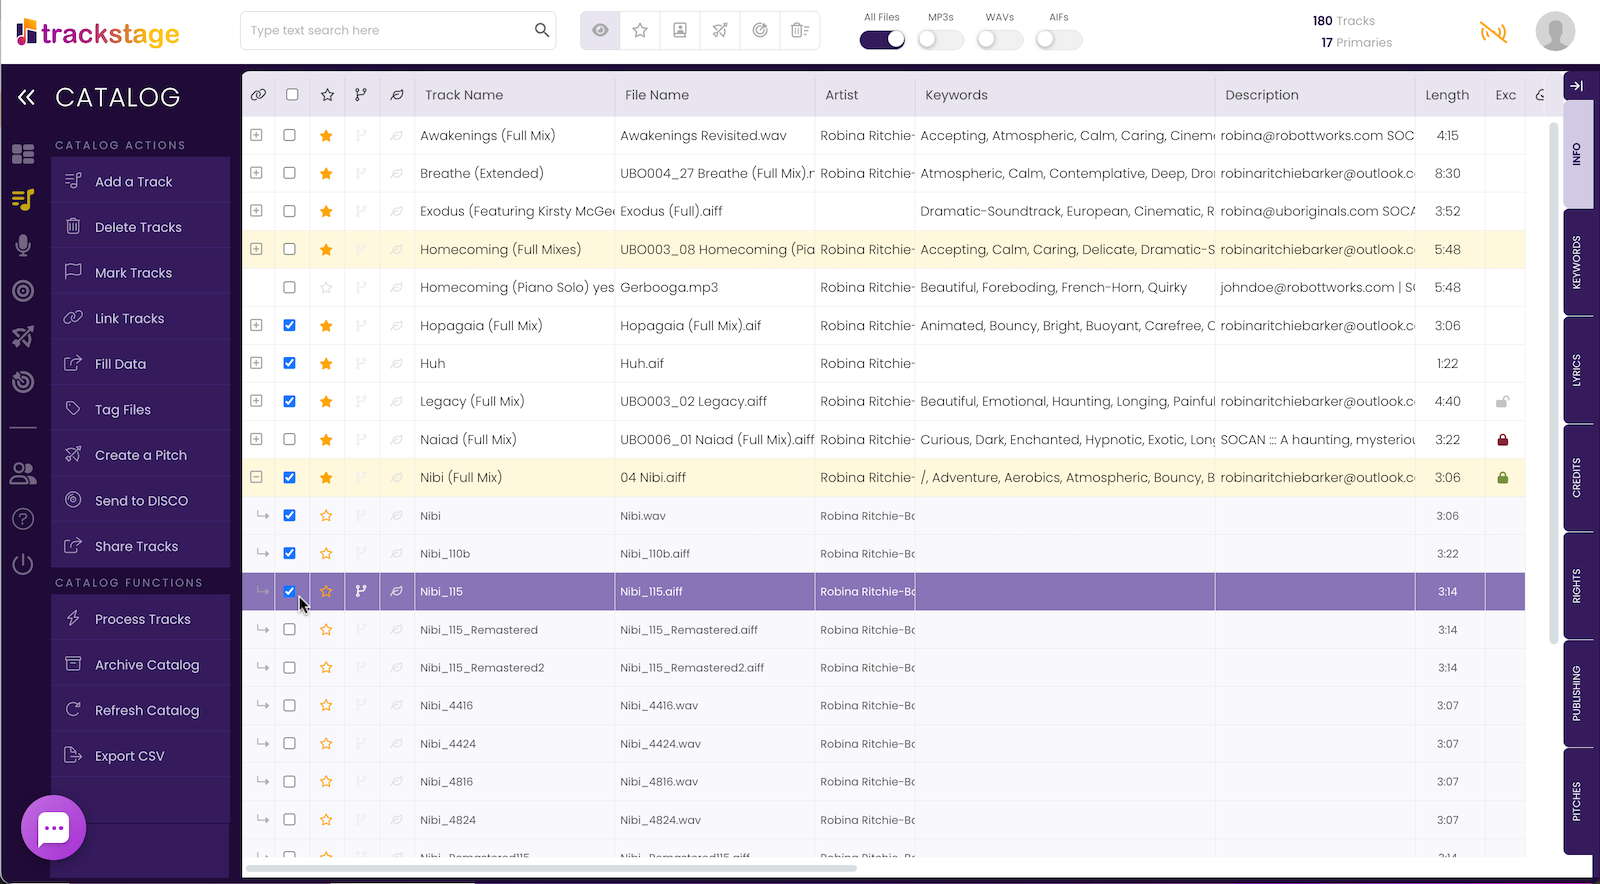
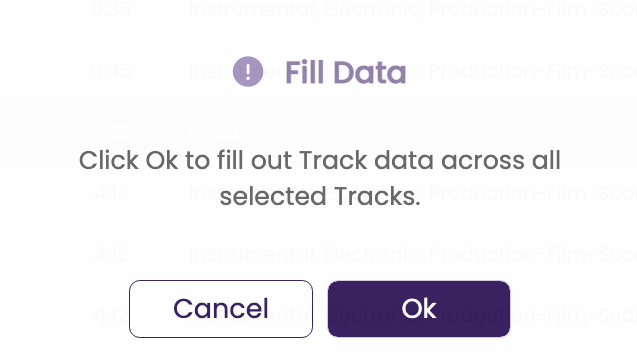
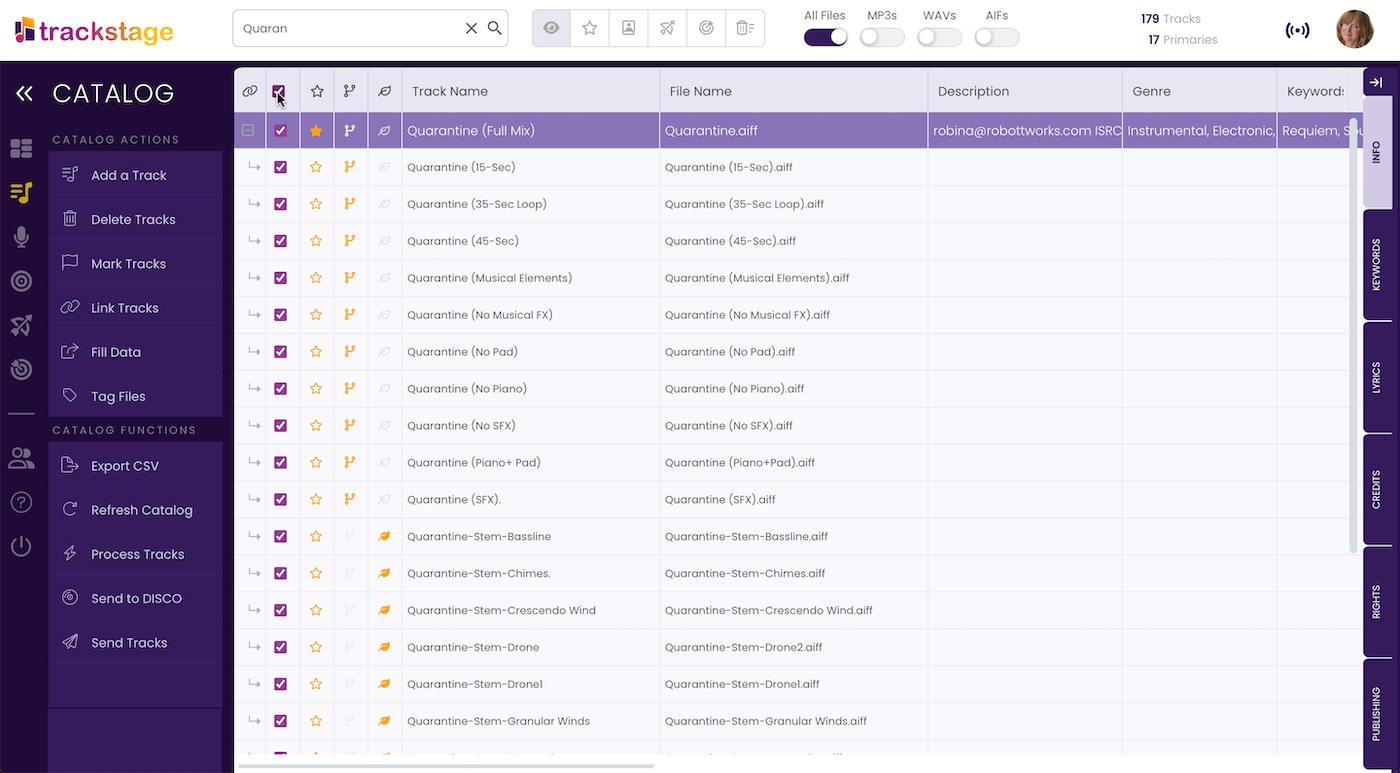
Once you have entered all your track's metadata into the tabs, use the Fill Data function to copy the tab data to all connected versions with a simple click.

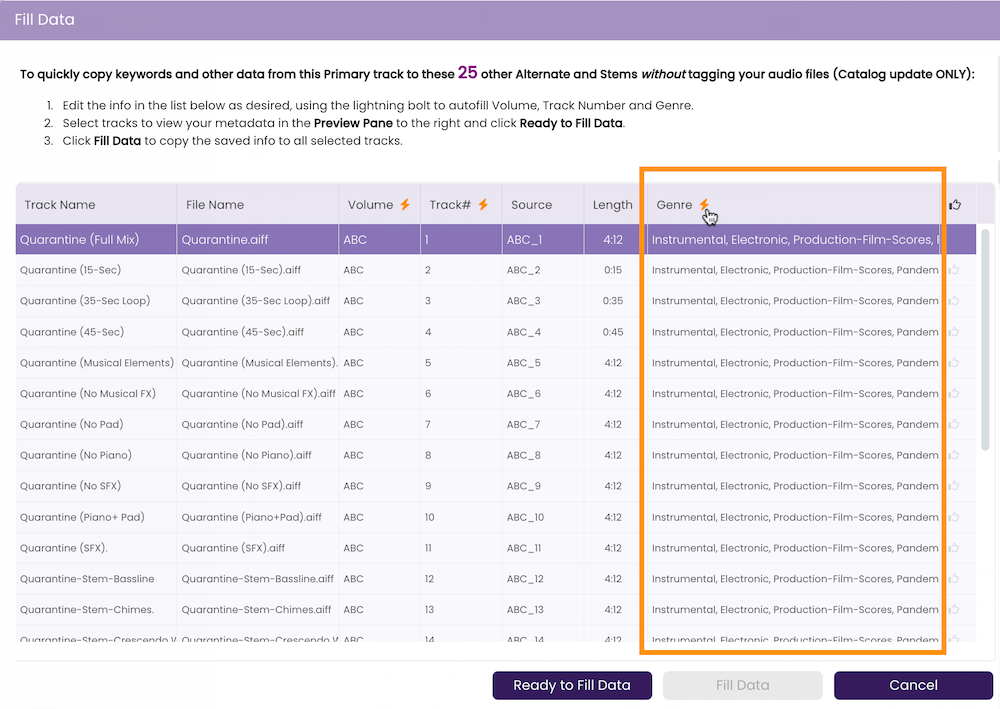
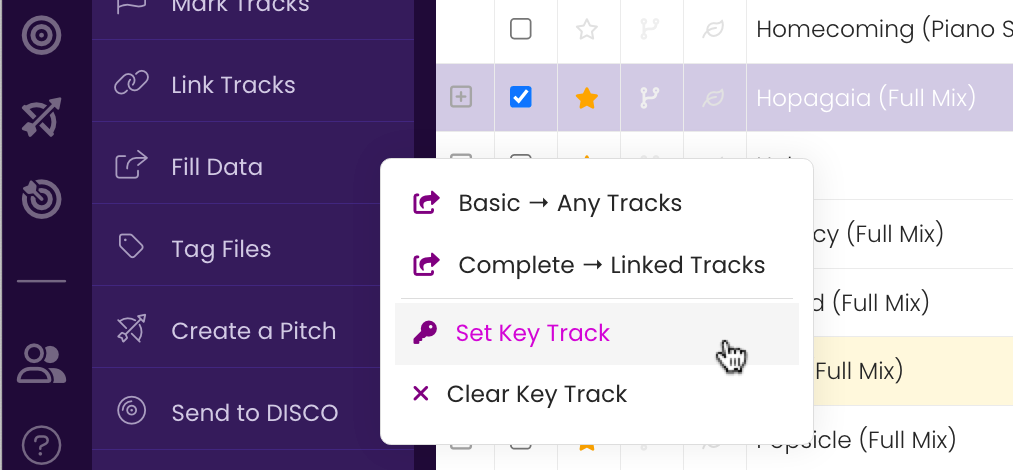
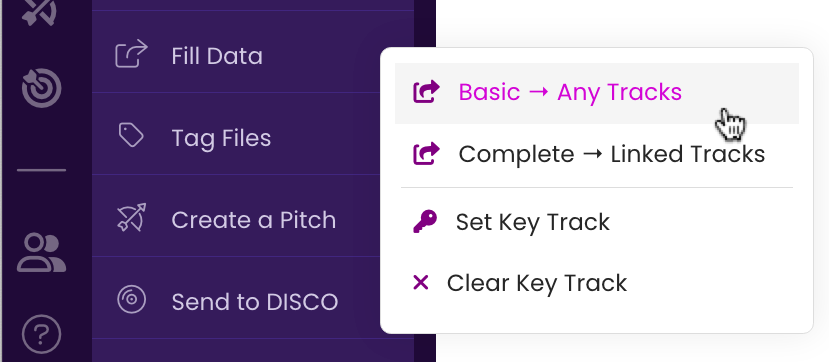
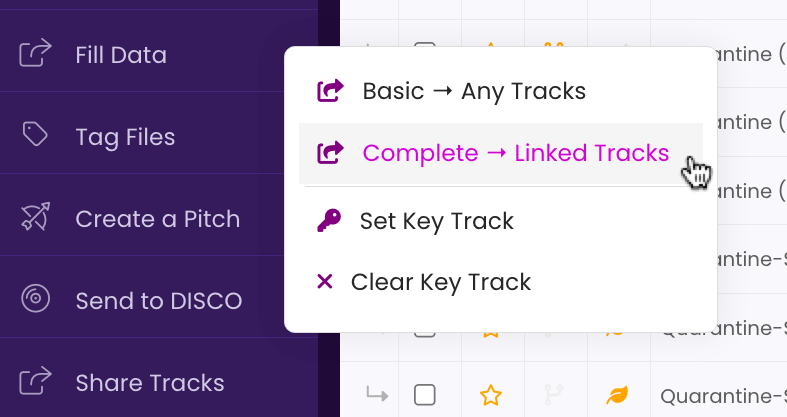
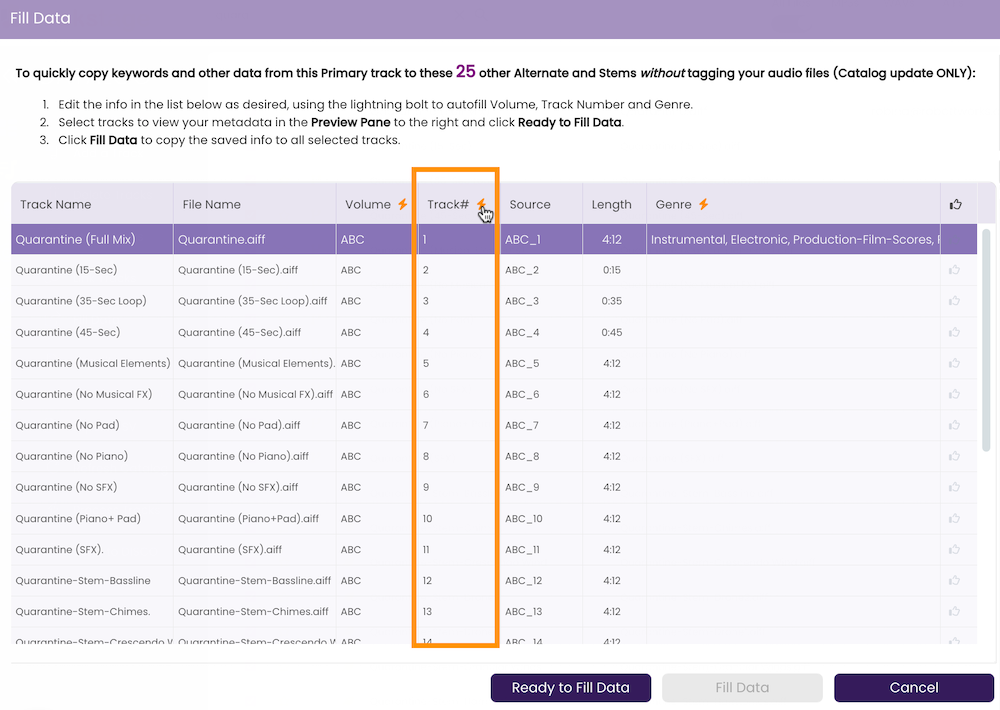
There are two methods to filling data: Basic, where you can copy a subset of Tab data across any tracks in your CATALOG; and Complete where you can copy all tab information from a Primary track to its linked Alternate and Stem versions.


Basic → Any Tracks

The following fields can be filled from a designated Key Track to any selected tracks in your catalog:

  • Artist
  • Composer Info
  • Grouping Info
  • Album/CD Title
  • Album Artist
  • Publisher Info
  • Volume
  • Registration Date
  • Release Date
  • Copyright
  • Copyright Details
  • Credits/Rights/Publishing Tabs
  • Production Type
  • Cue Type

Filling Basic Data
  1. Set your Key Track.
    Click the checkbox on the track that you want to copy the information from and from the Fill Data menu, select Set Key Track.


  2. Select the tracks you want to receive the info.
    Click the checkboxes of the tracks you want to have the info on the Key Track copied to. Shift-click the first and last track's checkboxes to quickly select multiple tracks, or click the checkbox in the header to select all tracks in the current view.

    Selecting the tracks to be linked in the TrackStage Catalog.


  3. Click on Fill Data > Basic → Any Tracks from the Side Menu.

    Clicking the Link Tracks button in the TrackStage Side Menu.


    The Fill Data window opens showing the selected tracks.

    Clicking the Link Tracks button in the TrackStage Side Menu.


  4. Select the Data to copy.
    From the Data panel on the right side of the window, select the data that you wish to have copied from the Key Track to the selected Tracks.

    Clicking the plus to expand linked tracks and only show all tracks linked to the Primary.


  5. Verify that everything looks good and click Ready to Fill Data.

    Selecting the Primary version of the linked tracks.


  6. Click Ok in the Fill Data confirmation dialog box.

    Clicking the Link Tracks button in the Side Menu.

    TrackStage processes the data and refreshes your CATALOG.

    Clicking the Link Tracks button in the Side Menu.


    Clicking the plus to expand linked tracks and only show all tracks linked to the Primary.


    The tracks show as HIGHLIGHTED to indicate that changes have been made to the tracks in your catalog that have not yet been tagged to the audio files.

    Clicking the plus to expand linked tracks and only show all tracks linked to the Primary.


  7. Clear the Key Track.
    Click the checkbox on the Key Track and from the Fill Data menu, select Clear Key Track.


Complete → Linked Tracks

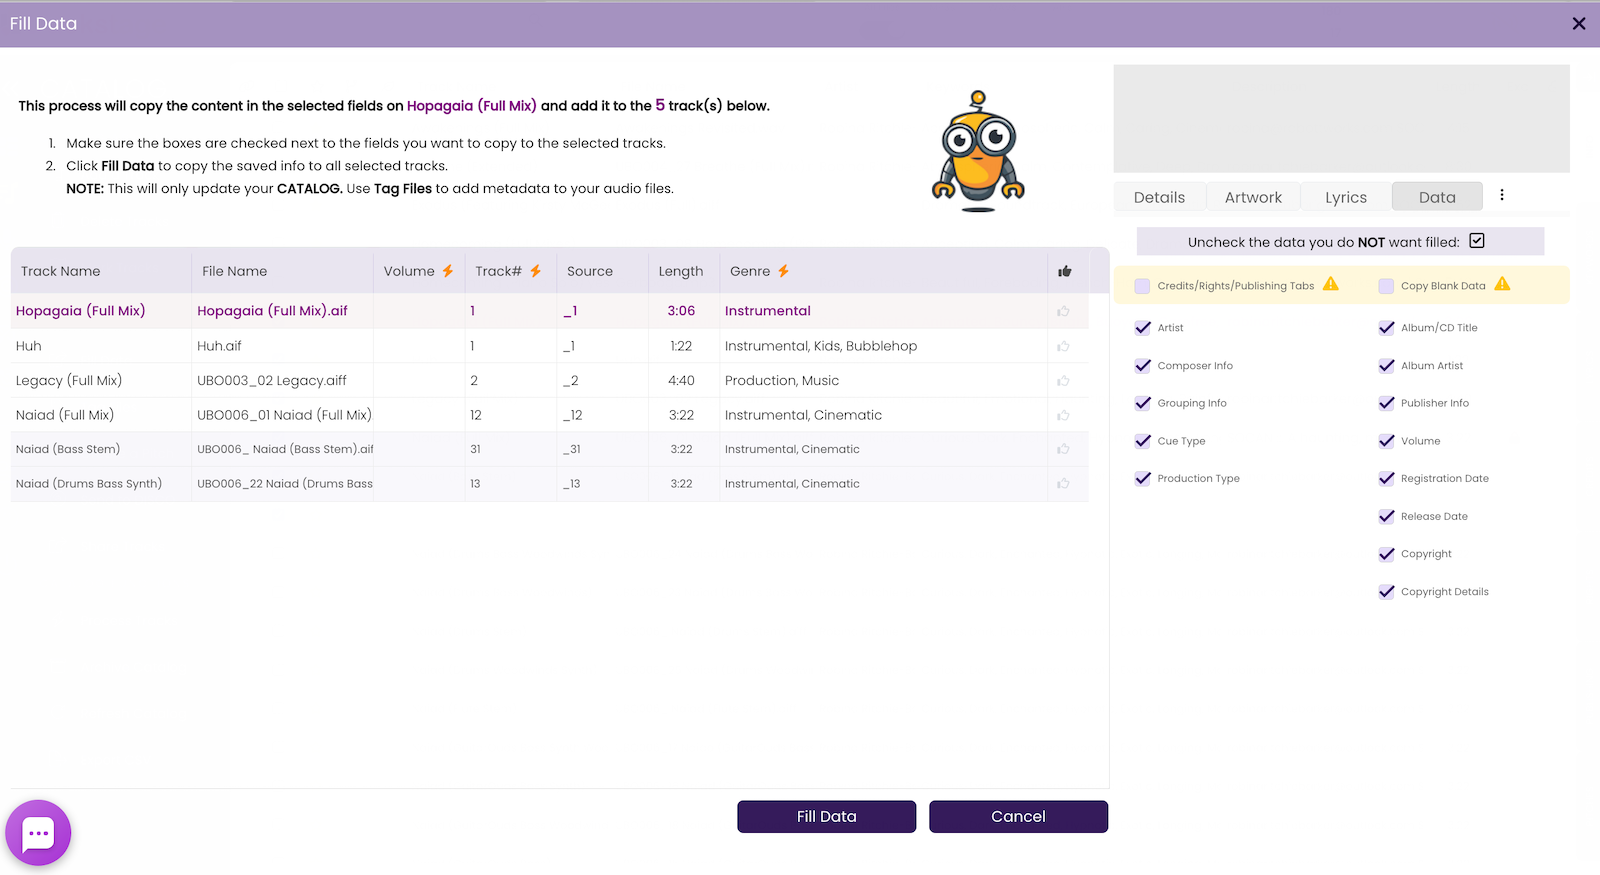
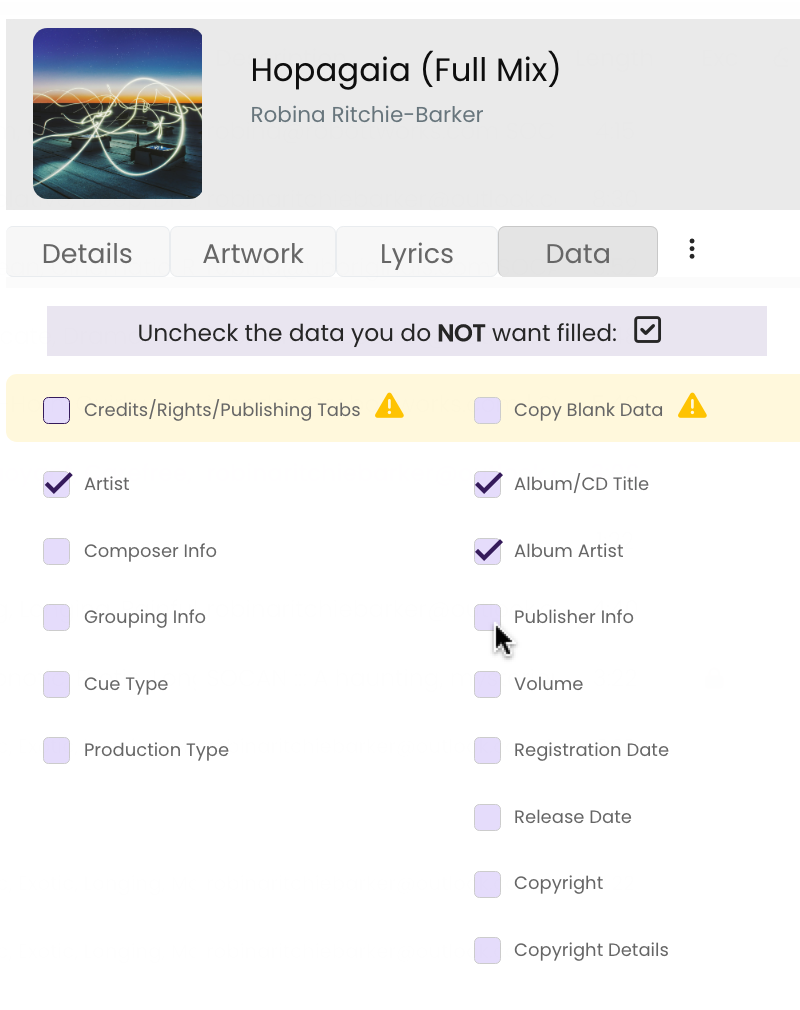
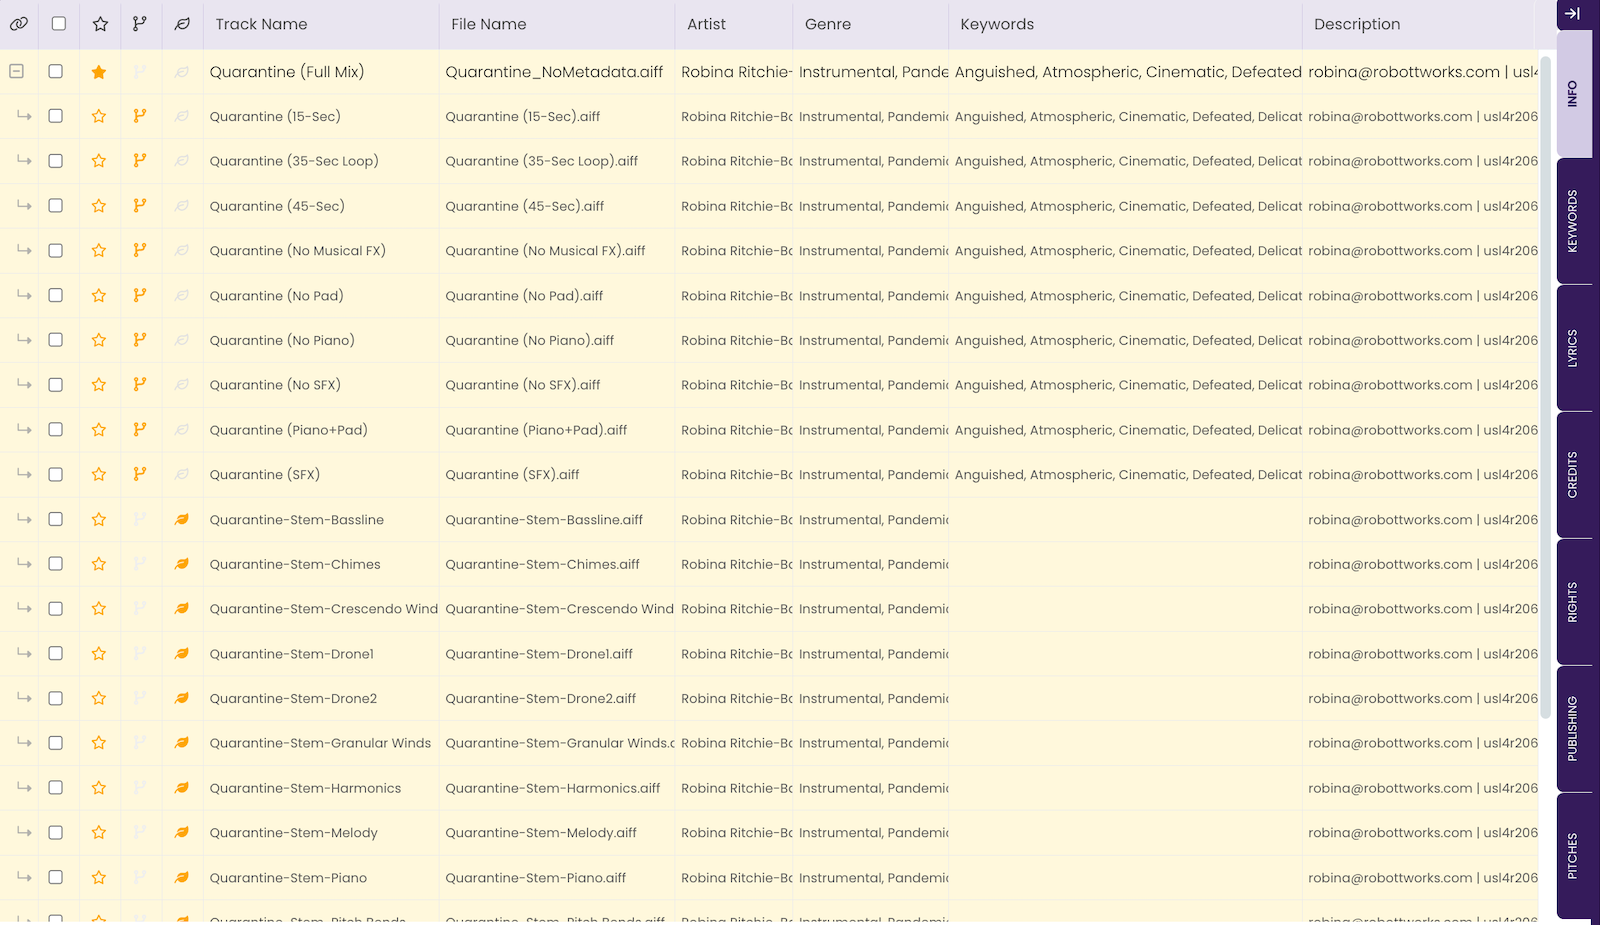
You can copy almost any Tab data between Primary tracks and their linked Alternate and Stem versions.

Select the Tracks
  1. Expand the Primary to view all linked tracks.
    Click the 
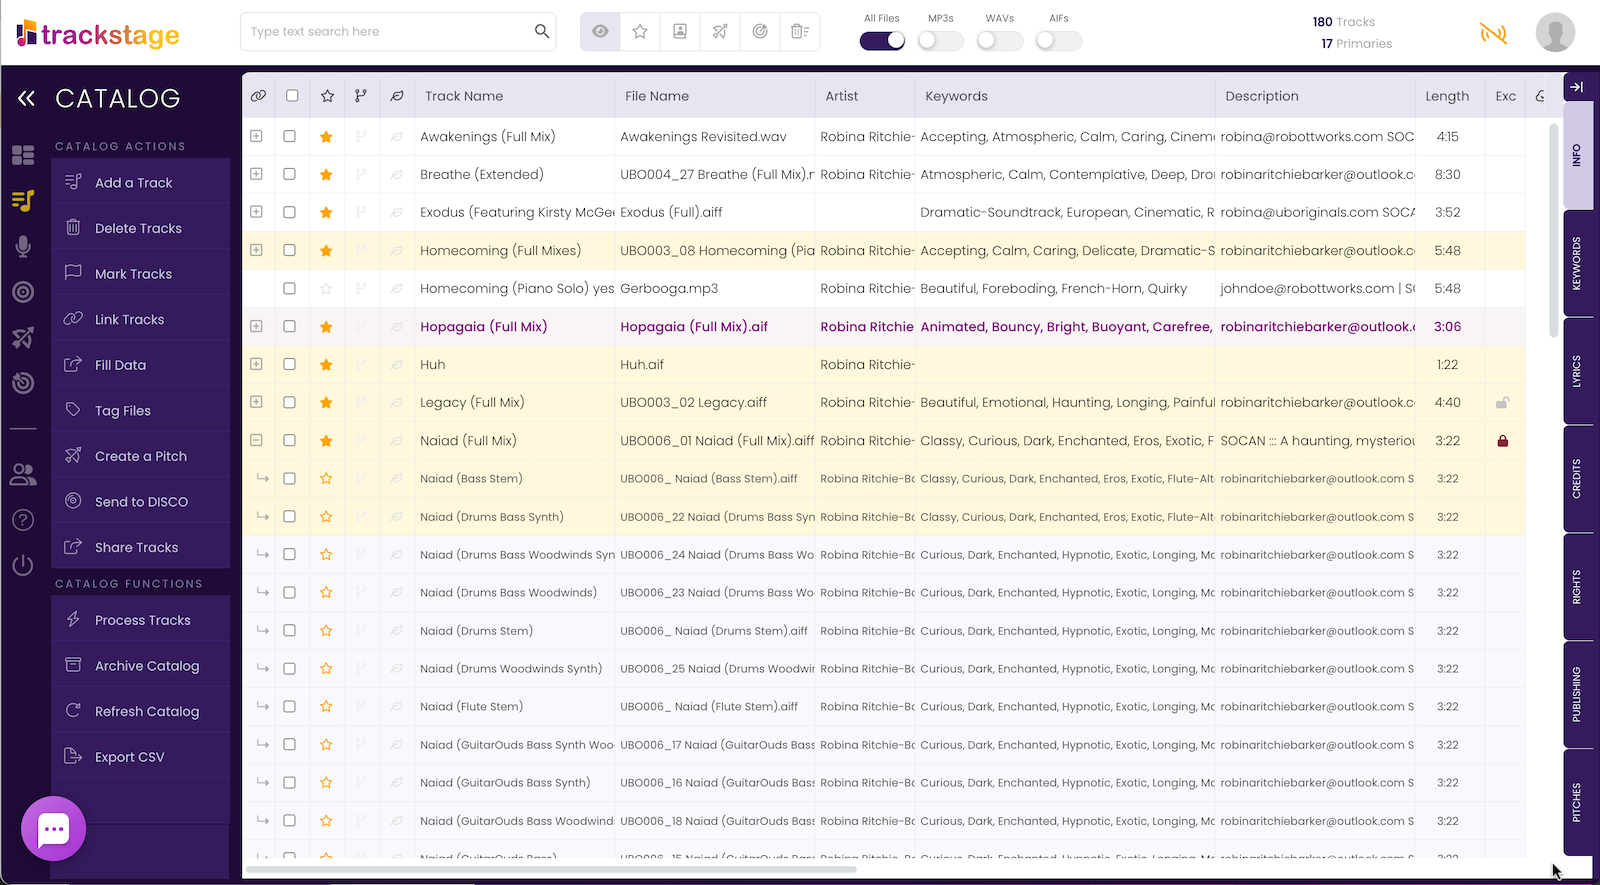
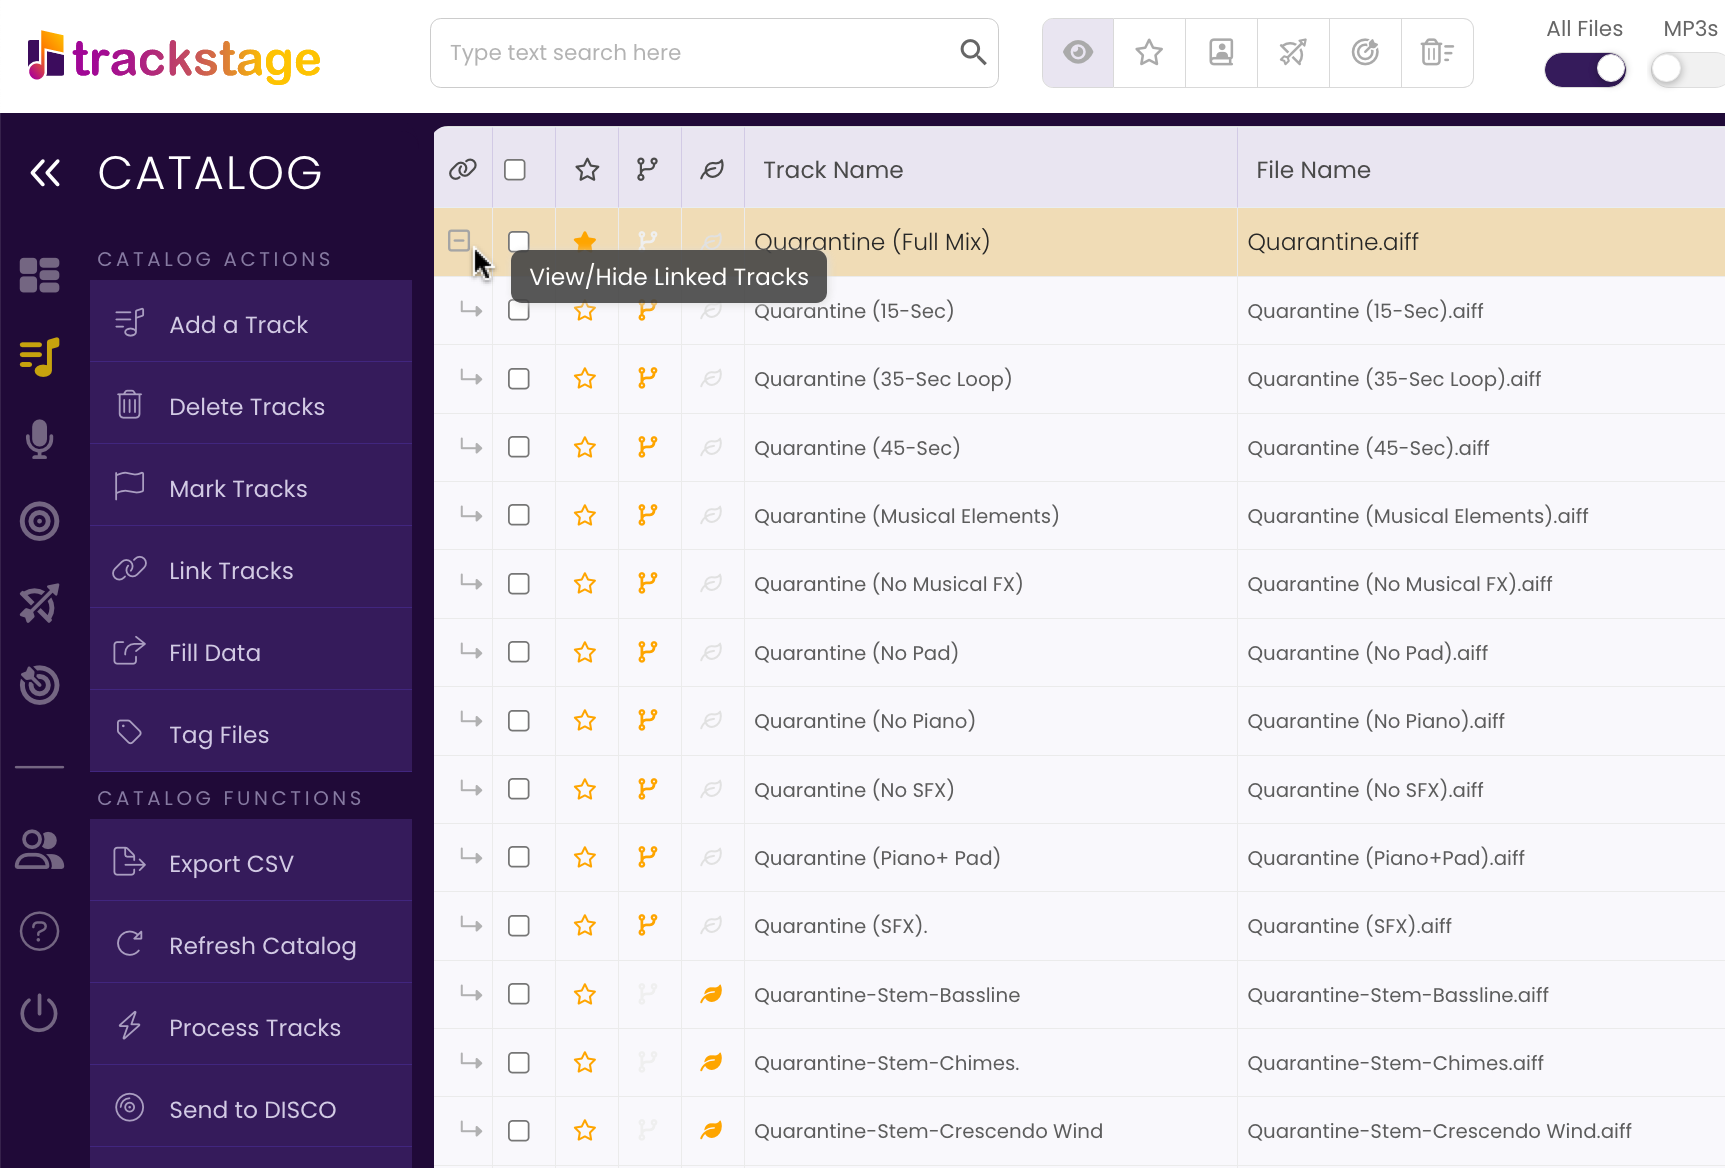
icon in the first column on the Primary track to show the linked tracks.

    Expanding the linked tracks by clicking the plus icon on the Primary.


  2. Select all versions of the track.
    Shift-click the first and last track's checkboxes to quickly select multiple tracks.

    Selecting the tracks to be linked in the TrackStage Catalog.


  3. Click on Fill Data > Complete → Linked Tracks from the Side Menu.

    Clicking the Link Tracks button in the TrackStage Side Menu.


    The Fill Data window opens showing the selected tracks.

    Clicking the Link Tracks button in the TrackStage Side Menu.

Fill Editable Data

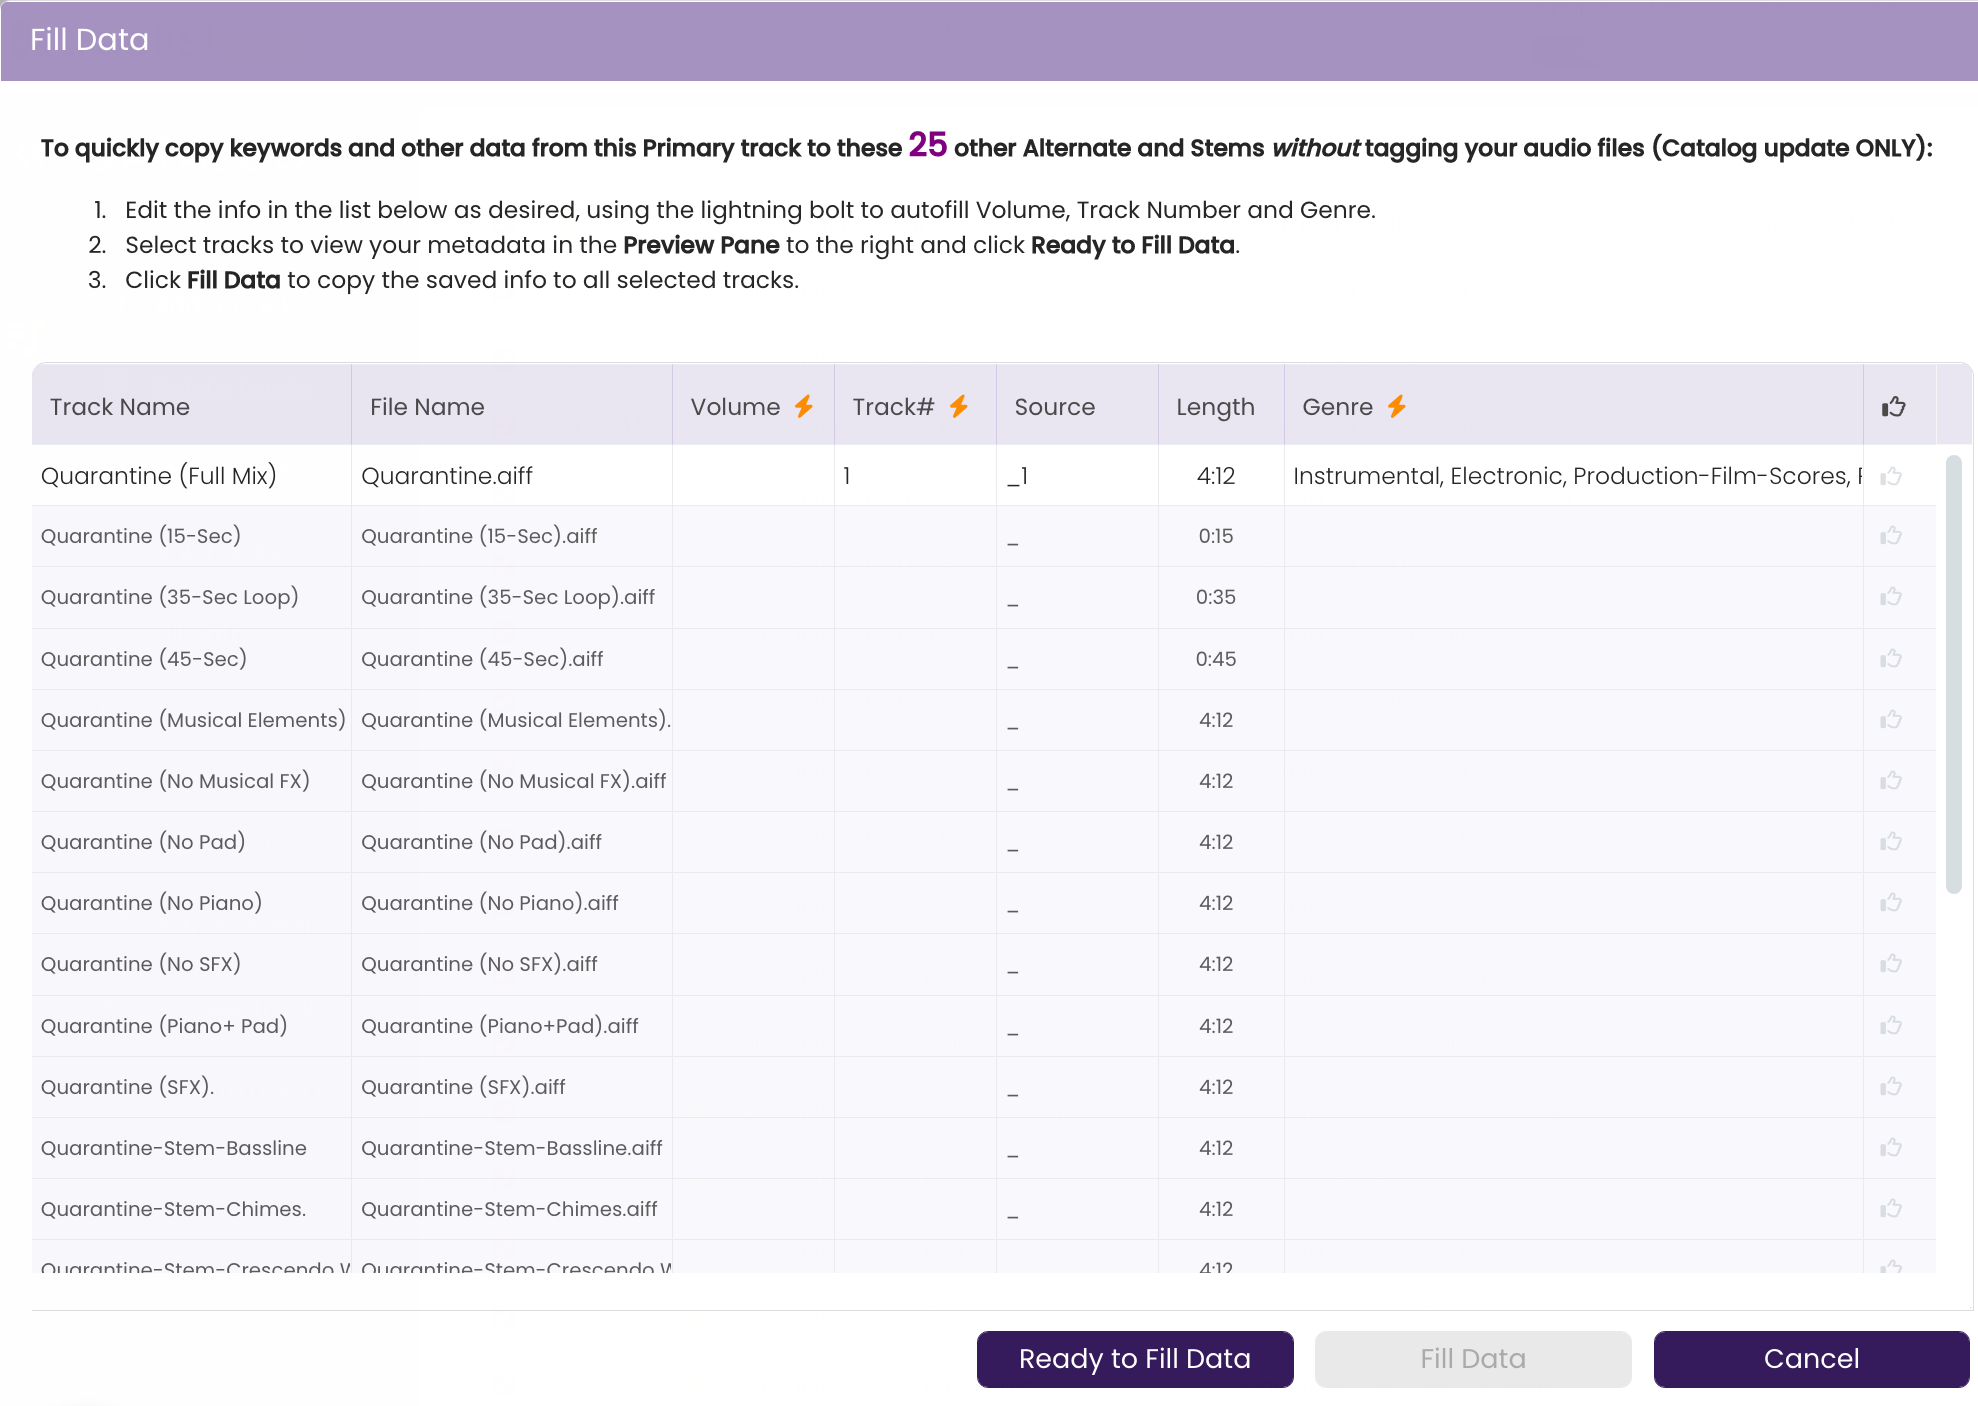
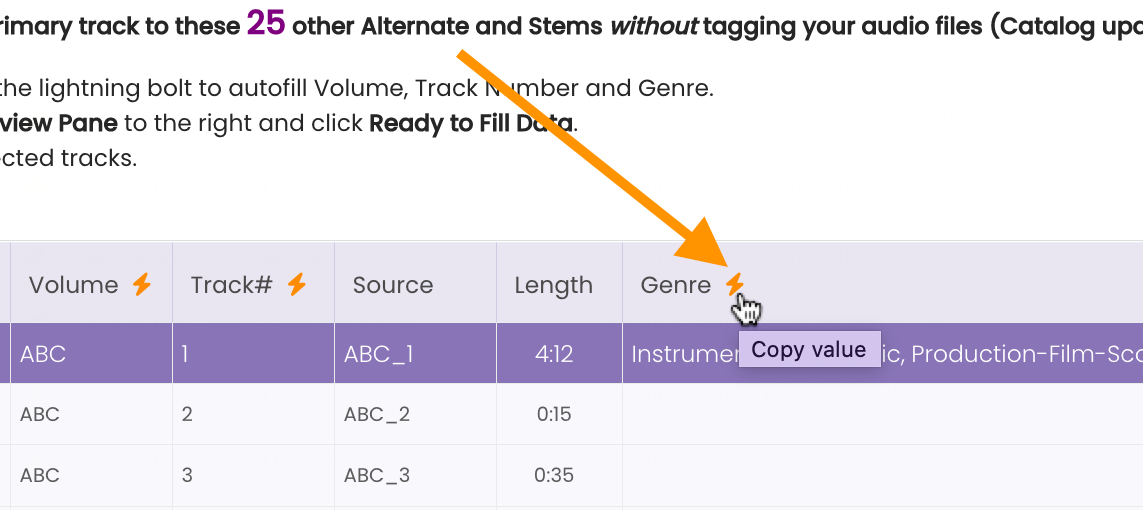
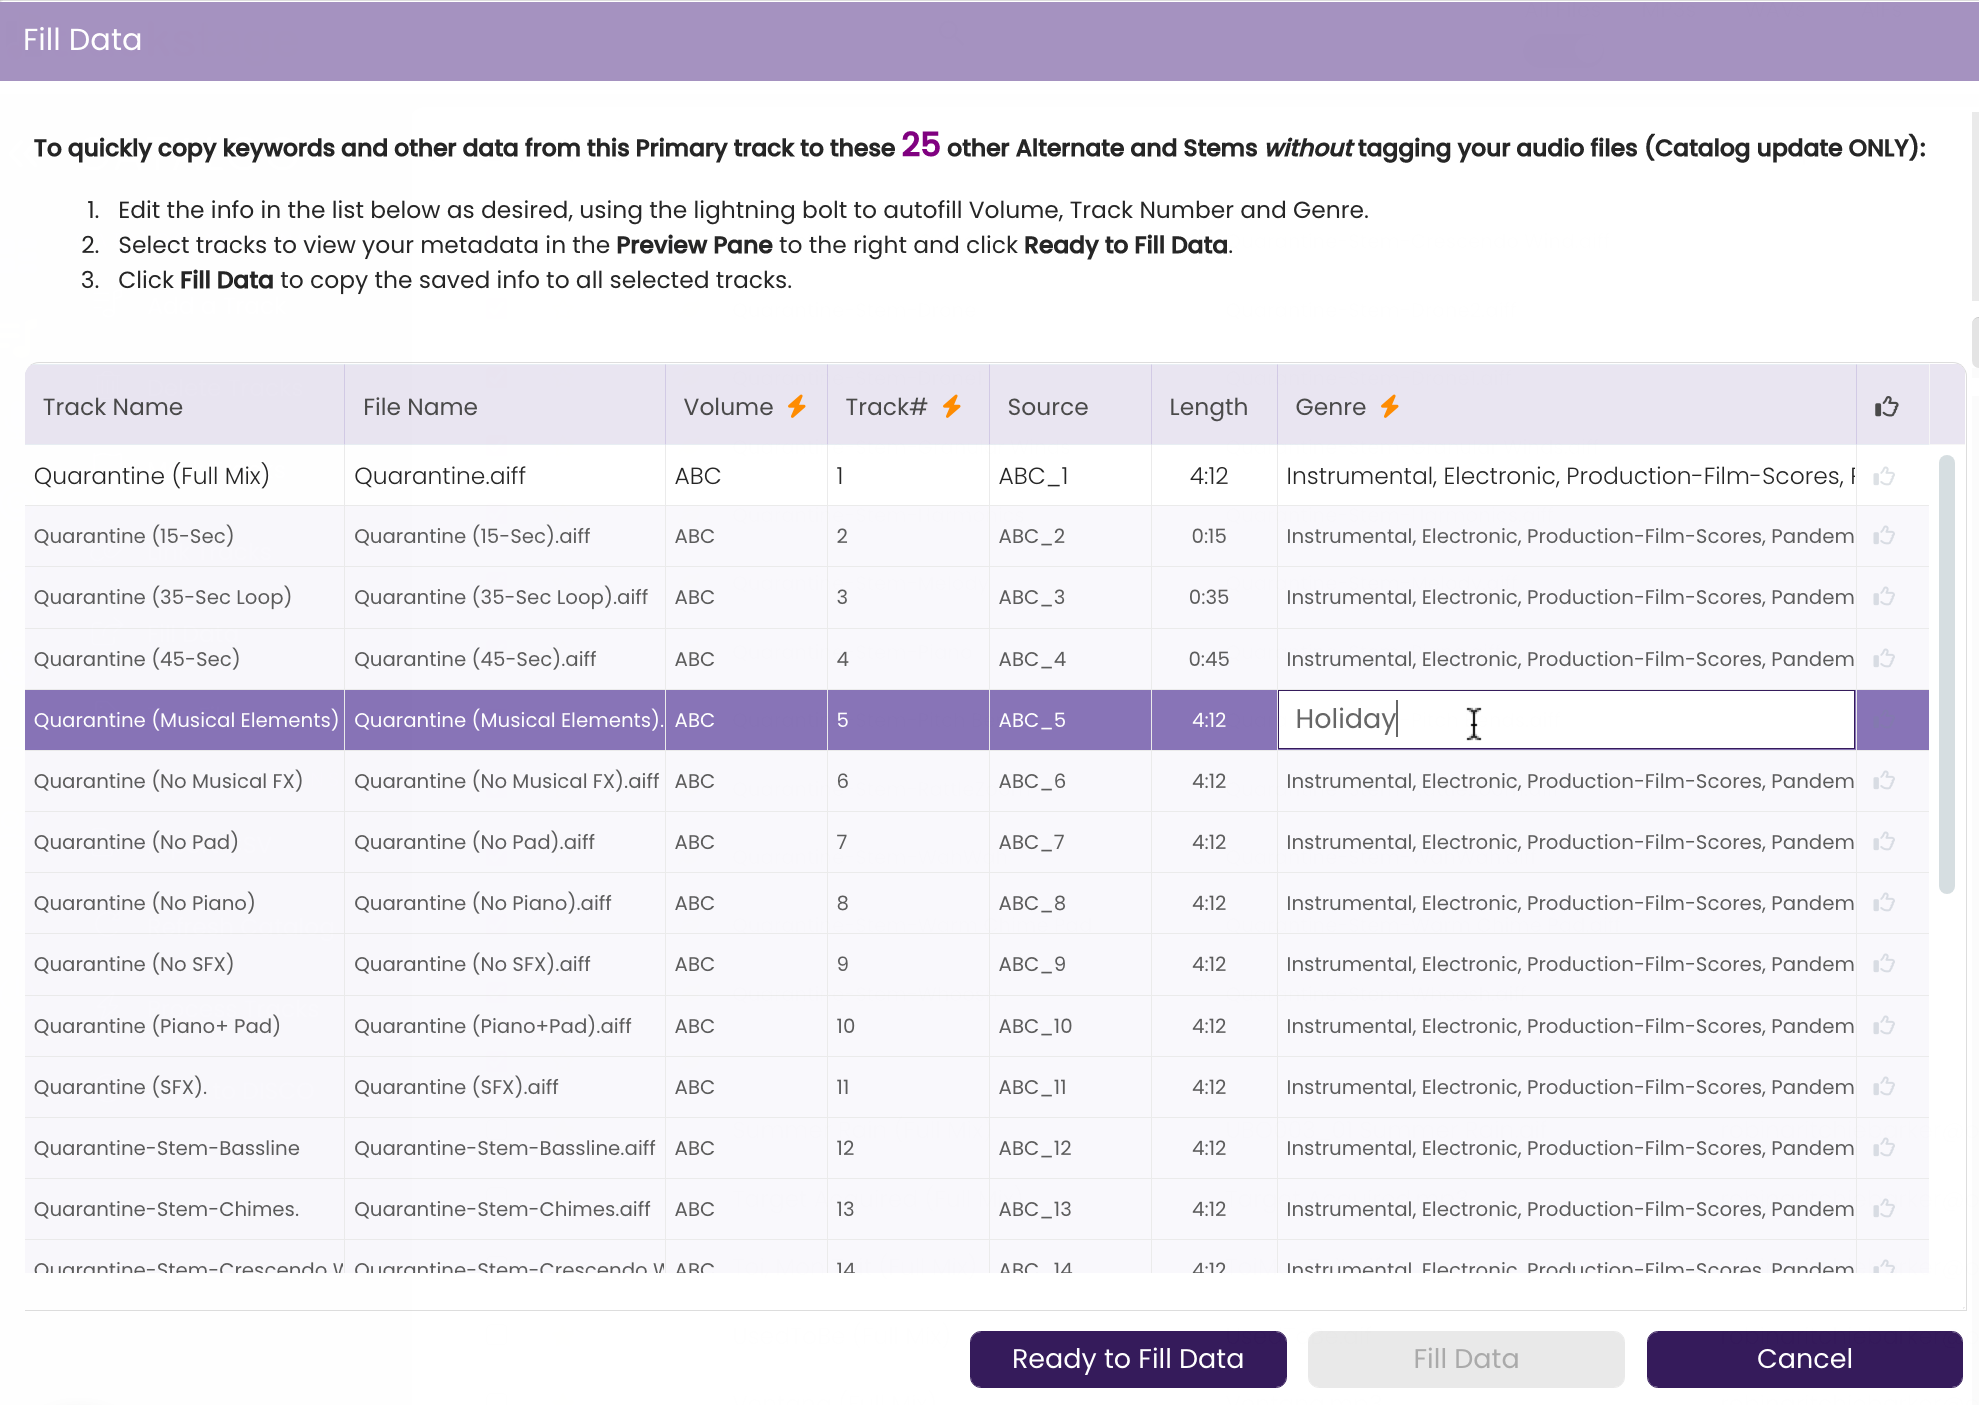
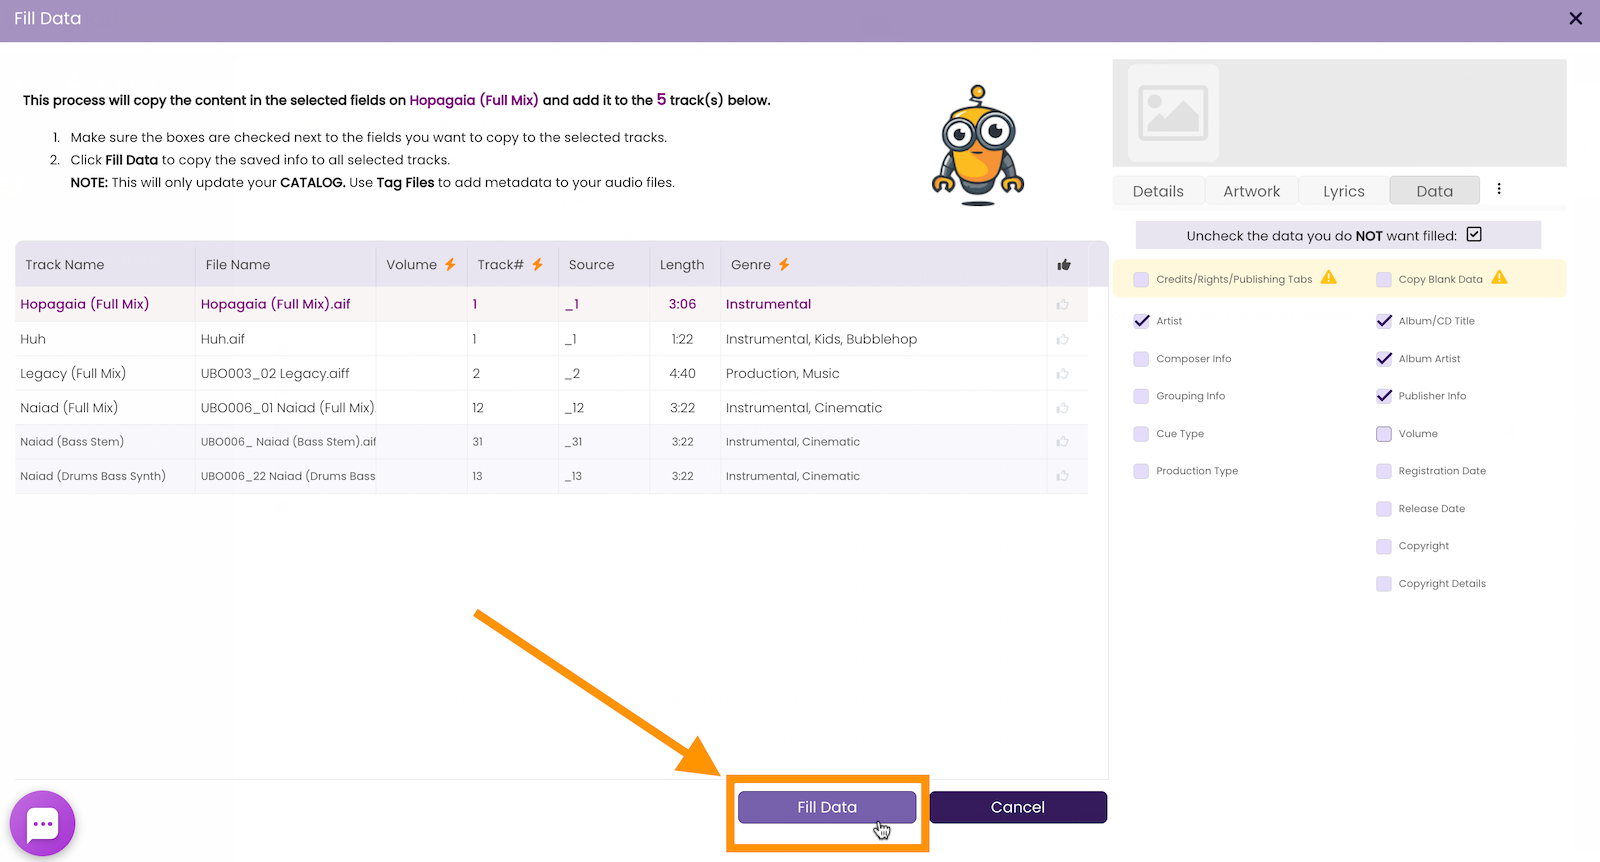
While the Fill Data function will copy all metadata that you entered on the Primary Track's Tabs, there are several fields that remain editable within the Fill Data window so you can fine tune information: Volume, Track #, and Genre.

  1. Create a Volume ID (optional)
    If you wish to create a unique identifier (like a SKU # or Product Code) for your track, or if you have been given a Volume Number by a Publisher or Library, enter it in the first line (the Primary Track) under the Volume column.

    Clicking the plus to expand linked tracks and only show all tracks linked to the Primary.


  2. Autofill the Volume ID
    Click the 
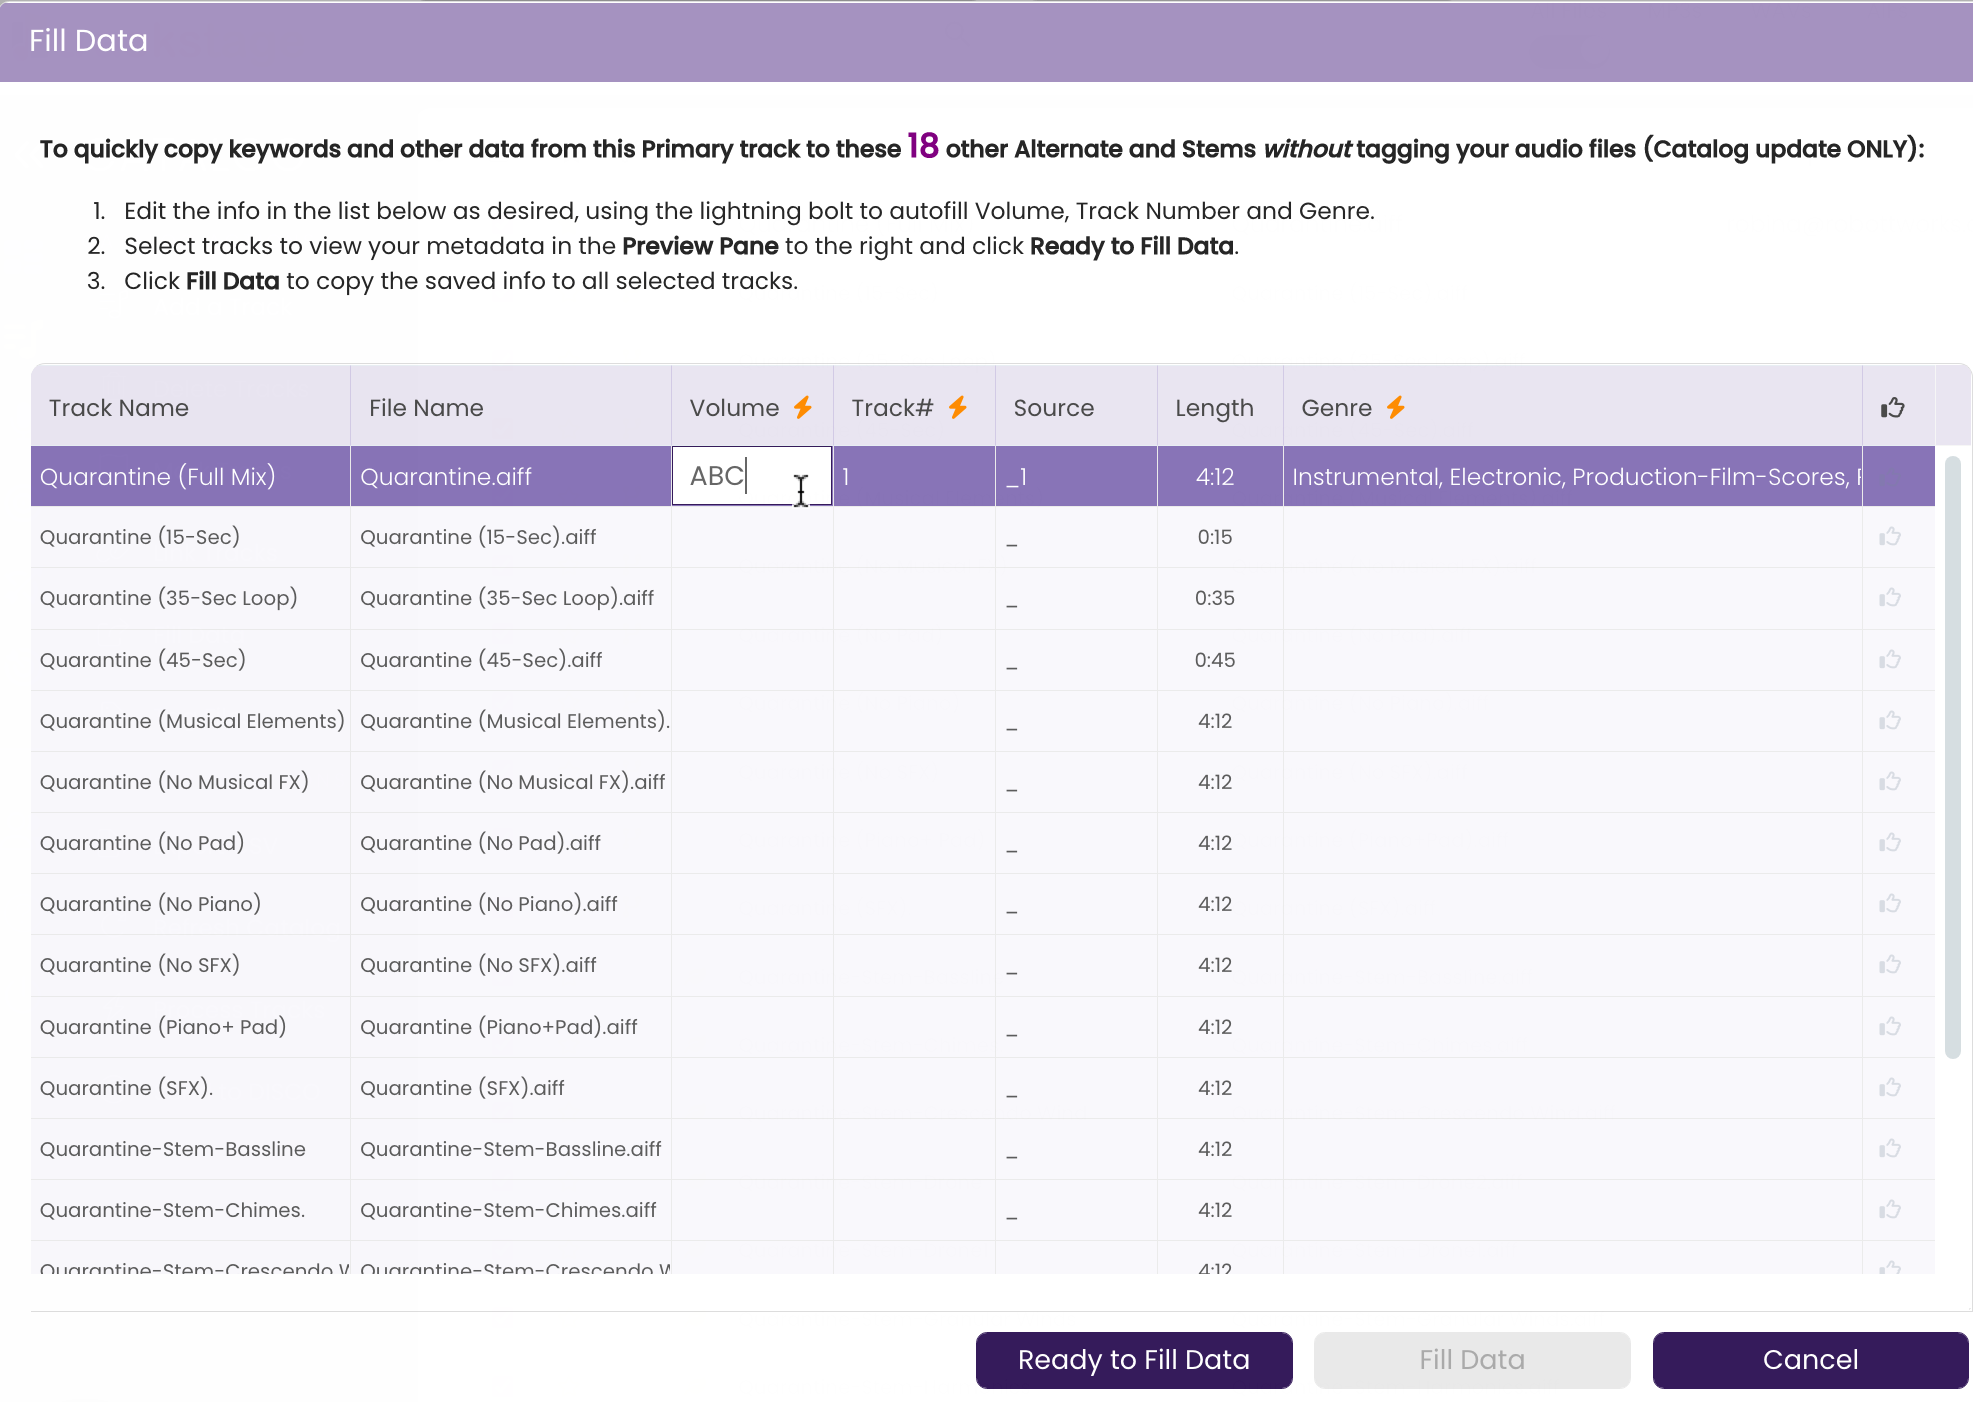
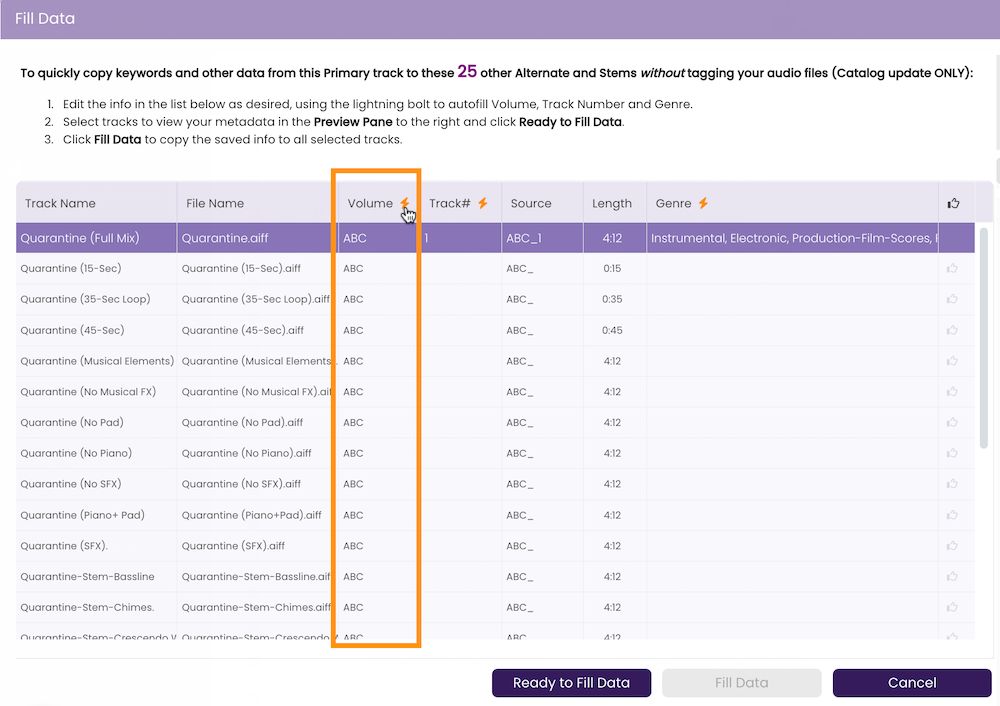
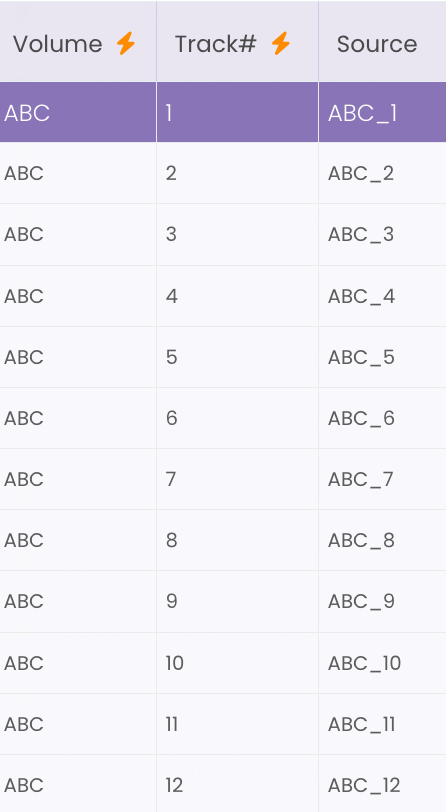
icon beside the Volume heading to autofill the Volume number to all the linked tracks.

    The lightning bolt next to the Volume header will autofill the volume ID to all linked tracks.


    The Volume ID is copied to all tracks.

    The Linked tracks are hidden - only the Primary shows.


  3. Autofill Track Numbers
    Click the 
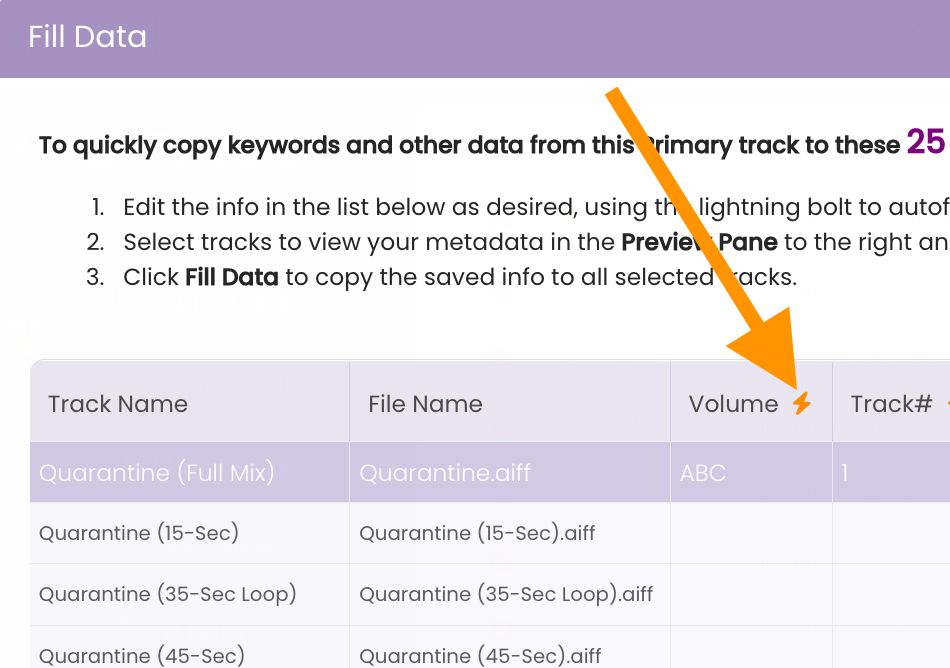
beside the Track # heading to add incremental track numbers to all linked tracks. Or you can edit them individually if you prefer.

    Clicking the plus to expand linked tracks and only show all tracks linked to the Primary.


    The sequential track numbers are added to all the tracks.

    Clicking the plus to expand linked tracks and only show all tracks linked to the Primary.

    You'll see that the Source fields are automatically updated with the sequential track numbers appended to the Volume ID. This combination creates your unique track identifier.

    Clicking the plus to expand linked tracks and only show all tracks linked to the Primary.


  4. Autofill the Genre
    Click the 
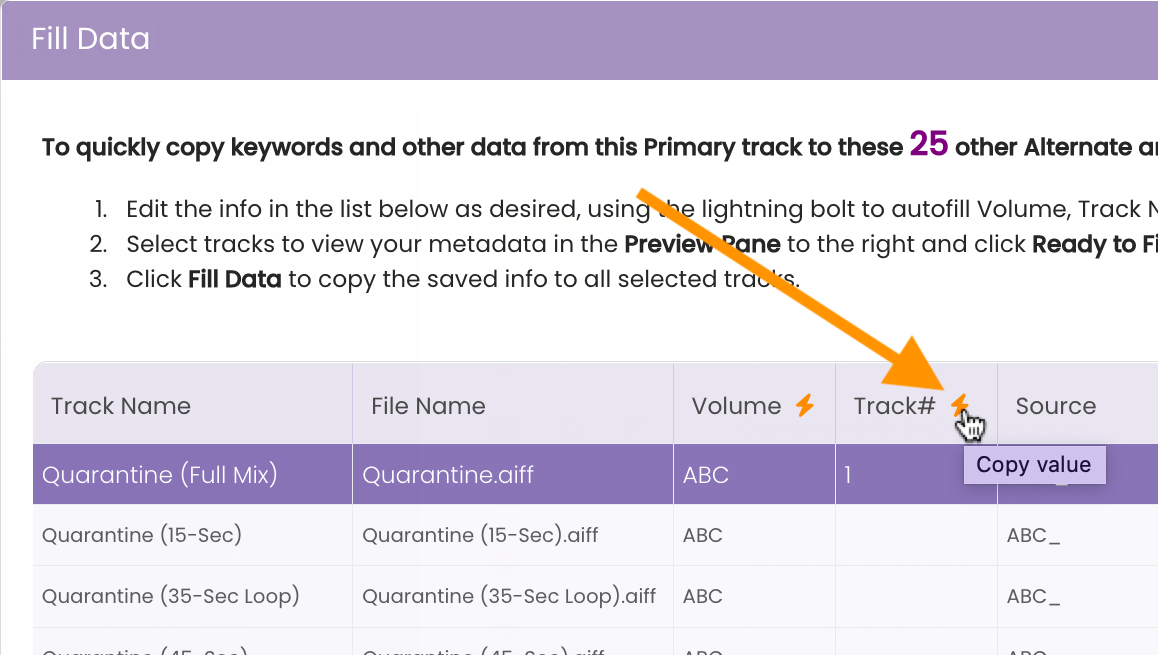
icon beside the Genre heading to autofill the genre to all linked tracks.

    The lightning bolt next to the Volume header will autofill the volume ID to all linked tracks.


    The Genre field is copied to all tracks.

    The Linked tracks are hidden - only the Primary shows.


  5. Edit Individual Genres
    The Genre fields are editable so you can alter tracks that differ from the Primary Track's genre, such as Holiday, Instrumental, or Acoustic, for instance.

    The Linked tracks are hidden - only the Primary shows.

Apply the Filled Data to the Tracks
  1. Verify that everything looks good and click Ready to Fill Data.

    Selecting the track to be unlinked.


    The Fill Data button becomes active.

  2. Click the Fill Data button.

    Selecting the Primary version of the linked tracks.


  3. Click Ok in the Fill Data confirmation dialog box.

    Clicking the Link Tracks button in the Side Menu.

    A warning box opens.


  4. Double-check that ALL your tracks should have the SAME SPLITS & RIGHS.

    Sometimes alternate versions have different collaborators or publishers with different rights splits than the Primary. Filling Data to those tracks will copy the rights that are on the PRIMARY track. So, if you have different splits for different versions, you'll either want to make sure to update those splits after filling the rest of the Primary track's metadata, or you'll want to remove those tracks from the Fill Data process before you proceed.

    Clicking the Link Tracks button in the Side Menu.


  5. Click Yes to proceed with the Fill Data processing, or No to cancel the Fill Data and make any needed adjustments.

    TrackStage processes the data and refreshes your CATALOG.

    Clicking the Link Tracks button in the Side Menu.


    Clicking the plus to expand linked tracks and only show all tracks linked to the Primary.


    The tracks are HIGHLIGHTED to indicate that changes have been made to the tracks in your catalog that have not yet been tagged to the audio files.

    Clicking the plus to expand linked tracks and only show all tracks linked to the Primary.